January 3, 2016

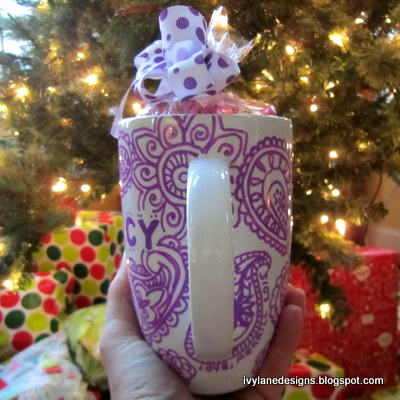
DIY Sharpie Mug in Purple Paisley

I recently had the good fortune to reconnect with a childhood friend.  Nancy is consistently positive and seems to always wear a smile on her face.  She brightens a room just by walking through the door.  I thought I would surprise her with a Sharpie mug.


In the past, I had found great success using a porcelain pen by the French company, Pebeo, that I used to make this mug and this tile coaster.  Since Pebeo doesn't make a paint pen in purple, I turned to Sharpie.  Sharpie makes oil-based markers that reportedly are permanent on nonporous surfaces.  I bought the five-pack of oil-based Sharpies that included purple, as well as blue, green, orange and pink.

Detailed instructions, including baking time, can be found here.  Be sure to only use oil-based and not the regular Sharpie markers.  
  

A cellophane bag filled with chocolates and a purple polka-dotted bow finished the Sharpie mug gift.


If you make a Sharpie mug, let me know!

Happy crafting!

♥ Merrill


November 11, 2015

Bold and Beautiful #11

6" x 6", acrylic on hardboard panel
SOLD
I have had so many requests via my Facebook page for this beauty, I painted a smaller version for purchase.  I love the bright, vibrant colors.  It makes me happy!

6x6, original acrylic painting on hardboard panel.  Watermark is not on the painting, natch.

Enjoy!

♥ Merrill 

July 11, 2015

Painting :: Surprise!

Surprise!  Acrylic on stretched canvas (36x36in.)

My daughter recently moved and asked that I paint something special for her bedroom in her new house.  My instructions were that it be big, with a black background and have bright flowers.  She wanted to be surprised.

I chose to paint a chalkboard-inspired background that really makes the brightly colored flowers pop.  And, it's huge!


Our friend Peggy who, with her husband, owns Barry Davis Produce Stand (be sure to like them on FB), had given Lauren a sunflower.  The sunflower ended up being the focal point of the painting.

  
It was a thrill for me to paint for a specific person, especially my daughter.  She loves her new SURPRISE painting!


I have had so many requests on my Ivy Lane Designs Facebook page for this happy painting, I painted a smaller (6" x 6") version for purchase.  Click HERE for details.

♥ Merrill 

July 5, 2015

DIY Kool-Aid or Capri Sun Juice Drink Pouch Tote Bag

Steve Jobs said, "My favorite things in life don't cost any money. It's really clear that the most precious resource we all have is time."

I treasure time spent with my daughter.  Each year on my birthday I ask for the same thing - her time.  We have built a bear, sang, swam, skated, walked, climbed, colored, cooked - and crafted!


In my Ivy Lane Designs shop, my creations are made from materials rescued from trash and recycling bins.   It only then makes sense that our favorite mother-daughter activity would be crafting together, often from recyclables.  

One year when we were apart on her birthday, I sent her balloons in a box - one of my proudest moments in my handmade gift-giving history.

A super fun project is making a tote bag from juice drink pouches.  Here is how we did it.


JUICE DRINK POUCH TOTE BAG

WHAT YOU NEED:

  • 16 drink pouches
  • Nylon webbing for the strap, length is your choice (available at Joann)
  • Scissors
  • A sewing machine
  • Nylon thread
  • Painter's tape (optional, although it does a nice job of keeping the pouches from slipping while you sew)

DIRECTIONS:

1.  Empty and clean your juice pouches.  If you clip the bottom of the pouches, they'll dry faster.

2.  Set your sewing machine to the widest, zig zag stitch available.  A zig zag stitch is stronger, allowing for a more durable bag - and it looks cool!

3.  Overlap the sides of the pouches and sew.  You want to end up with four strips of three.  This will make the front and back of the bag.  


4.  Then sew two rows of threes together.


 Now you have the front and back of the bag.

5.  Zig zag stitch across the top of the two panels to add durability.

6.  Now, add your straps.  Cut two equal length strips of nylon webbing.  Stitch to the inside of each panel.


7.  Now it's time to make the bottom.  Overlap the top and bottom (not sides) of two pouches and sew them together (see picture below). 

8.  Put wrong sides together (silver to silver) and stitch bottom piece to front piece.  Repeat for the back of the bag.


9.  Repeat step #7 to make the two side pieces.  With wrong sides together, stitch side pieces to front, back and bottom of bag.  This is the hardest step.  Don't be afraid to smush the corners.


10.  Snip threads and enjoy your new eco-friendly tote bag!


A variation is to sew the pieces wrong side together.  We like the look of the exposed seams.

A mother's daughter is a treasure.  Enjoy your time together.

♥ Merrill 

July 3, 2015

My Favorite Things :: Salty Sea Dog Painting

My style of decorating is always evolving.  I move on and grow and change.  But one thing is constant and that is my love of art.  On a weekend trip along the eastern shore of the Chesapeake Bay in a tiny town in Maryland, I happened upon a painting of a sea captain.  He was down a narrow alley, displayed on the side of a building.  I knew immediately that he had to be mine.

He seemed to be saying, "Avast, ye salty sea dog!  Take me home."  So, I did.


Now, he watches me shower, which is only a little creepy, and seems to have adjusted well to his new home.


Personal style is a journey - not a destination.  One that takes a lifetime.

♥ Merrill 

June 15, 2015

Random Acts of Kindness: Spaghetti with a Side of Love

Today we served 90 meals of spaghetti with meat sauce, garlic bread, Caesar salad, mixed veggies, fruit salad and a variety of scrumptious desserts to those in need -- no questions asked.  Every third Monday, our merry band of volunteers can be found at Christ Episcopal Church, serving hot meals to anyone in need, through a community meals program sponsored by the Pottstown Cluster Outreach.

We have great fun while working to make each person feel special. 

  
Our group's aim is to not only feed those in need, but to inspire others to practice kindness.  

For many, the dinner we cook is their only meal of the day.  Over 49 million Americans are food insecure, meaning they don't know where they will get food for their next meal. The average food stamp budget is $3.00 a day. We have some work to do, folks.  

Our volunteers sit with our guests and talk about things that are important to them.  Today one gentleman shared his earliest childhood memory.  He said he vividly recalls when he was three, he helped his dad build a house in the Poconos.  Another proudly talked about his seven kids and oodles of grandkids, and how much he looks forward to being a great grandpa some day.

If you have been thinking about volunteering, just do it!  Don't wait for a friend to join you.  Just pick up the phone and call your library or a food bank or wherever you think there might be a need for a smile and a helping hand.  Your heart will be glad you did.

If you live in the Pottstown area, the Cluster could really use your help.  Click HERE for the online volunteer form, or call Vicki Bumstead at:  (610) 970-5995.

♥ Merrill 


February 14, 2015

Happy Valentine's Day!

Happy Valentine's Day, everyone!  Wishing you a day filled with LOVE ... and cake!


♥ Merrill 
P.S.  Scrumptious baked goodies available at Vegan Treats.

January 24, 2015

Random Acts of Kindess: Martin Luther King Day of Service

Dr. Martin Luther King, Jr. asked, "What are you doing to help others?"  Our merry band of volunteers celebrated Dr. King's birthday by preparing, cooking and serving 83 hot meals for those in need through a local Community Meals program sponsored by the Pottstown Cluster.  Twenty volunteers of all ages worked together to make this meal a success!


On the menu was a delicious pasta with a creamy butternut squash sauce (see recipe below), made possible by a generous donation of beautiful, fresh butternut squash and onions by Barry Davis Produce Stand.  Be sure to like them on Facebook, and visit their stand for fresh fruit and vegetables.  A huge thank you to Barry and Peggy Davis! ♥


Preparation for this Monday meal started on Saturday, when volunteers arrived at our house armed with cutting boards, peelers and knives.  Six hours later, the veggies were prepped, cooked and the sauce was very close to being ready.  Emmanuel Lutheran Church donated a ham that we diced, pan fried and added to the yummy sauce.


Everyone loved the meal!

Here is the pasta recipe that makes 4 servings.  I multiplied it many, many, many times, using 100 cups of onions and about 14 squashes, although I may have lost track. 

PASTA WITH A CREAMY BUTTERNUT SQUASH SAUCE
PRINTER-FRIENDLY RECIPE

Serves 4

Ingredients:

1 1/2 tablespoons olive oil
1 cup onion, diced
2 cloves minced garlic (I use the stuff in a jar from Costco)
4 heaping cups peeled and diced butternut squash
2 cups chicken stock (I used the concentrated kind in a jar, also from Costco)
1/8 teaspoon thyme
1 bay leaf
salt & pepper, to taste, being sure to taste as you go
12 oz. ham, diced (optional)
1/4 cup grated Parmesan cheese
1/4 cup heavy cream
2/3 lb. pasta, cooked to al dente (I used farfalle)

Directions:

Heat olive oil in large skillet. Sauté diced onion until browned, about 5 minutes. Stir in garlic and diced butternut squash and cook another 3 minutes. Add chicken stock, thyme, bay leaf, salt and pepper. Cover and bring to boil. Reduce heat and simmer for 10 minutes or until squash is tender. Remove bay leaf and puree in blender until completely smooth. Heat skillet.  Add diced ham and fry until browned.  Stir in ham bits, Parmesan cheese and cream. Toss with cooked pasta, serve and enjoy!


The Pottstown Cluster helps individuals make real progress in moving from dependence to productive self-sufficiency.  In addition to providing hot meals to those in need in the Pottstown community, the Cluster distributes groceries through its Food Pantry, and its Dry Goods program provides clothing, personal hygiene products and cleaning supplies.  Read about these wonderful programs and others HERE.

You can help!  Make an online donation through the secure website, and learn how you can volunteer.  "The time is always right to do what is right." ~Dr. Martin Luther King, Jr.

~Merrill ♥

January 23, 2015

Ivy Lane Designs Real Simple Feature

Real Simple magazine included my Valentine's Day conversation heart crayons in their "19 Cute Valentines Day Gifts for Kids."  Who's a HAPPY girl!

Here's what my new friends at Real Simple had to say:  Stamped with messages like “Be Mine” and “True Love,” these handmade heart-shaped crayons are modeled after the classic Valentine’s Day treat. The set of five comes packaged like a box of chocolates—each brightly colored crayon sits in a cupcake liner and looks almost good enough to eat.

Get yours in my Ivy Lane Designs Etsy shop. 


Thanks, Real Simple! ♥


Happy crafting!

♥ Merrill 

December 23, 2014

DIY Glass Photo Ornaments

Around the holidays, we like to give our friends and neighbors a little something to thank them for making the world a better place.  For years, we gifted living Christmas trees.  This year, we made glass photo ornaments.  

Below, you will find examples, as well as a materials list and illustrated instructions so that you can make your own DIY glass photo ornaments.

We made this ornament to celebrate the birth of a good friend's grandson.


 And, several for neighbors ...


What you will need:
  • Glass ornaments.  I used 3-inch ornaments.
  • Resized photo so that the picture lends itself well to a 3-inch circle.  I tweaked mine using Microsoft Publisher, then emailed them to Costco.  I ordered extras to allow for trial and error.
  • A 3-inch hole punch, or a 3-inch template and a pen (I used a 50% off coupon to purchase an EK Tools Circle Scissor Pro at Michaels - Soooo worth it for this project.  If you are making one or two, hand cutting is fine.  More than that, think about buying a three-inch hole punch or this cutter).  
  • Cutting board, if using the EK Tools Circle Scissors Pro
  • Buffalo snow (I found this at AC Moore.  It's nice and sparkly)
  • Funnel
  • Scissors
  • Fishing line
  • Tape
  • Glue - I used my favorite glue that I wrote about HERE. 
  • Two bamboo skewers (chopsticks might work) to straighten out the photo after you've rolled it up and inserted it in your ornament.
  • Colored scrapbook paper for back of ornament (year or sentiment printed, optional but I think adds something)
  • Printer, if adding the year or sentiment
  • Ribbon (grosgrain ribbon works the best - not wired)
  • Silver metallic thread for hanging (optional) 
  • Tags (optional) 
  • Treat boxes, or bags (optional) 

HERE'S HOW TO MAKE YOUR OWN GLASS PHOTO ORNAMENTS (written and illustrated instructions below):

Cut two three-inch circles, one from your photo, one from color-coordinated scrapbook paper.  I printed 2014 on the back of the scrapbook paper.

Use a funnel to put buffalo snow in your ornament.

Cut a piece of fishing line about 12" long.  Tape the center of the line on the bottom of the middle of the photo (see photo below).  Then tape it again at the top.  You will use the fishing line to help position the photo.

Glue the photo circle to the colored scrapbook circle.  

Roll glued circle and insert in ornament.  

Use bamboo skewers to flatten out the circle.  It will be a little like building a ship in a bottle, which I have never actually done but seen on TV.

Poke the ends of the fishing line through the two little holes in the ornament cap.  Tie knot.  Trim ends.

Return cap.

Add ribbon.

Add silver metallic thread for hanging.

Add personalized tag.

Tuck inside gift bag or box.


ILLUSTRATED INSTRUCTIONS:


Happy crafting!

♥ Merrill 


November 20, 2014

DIY :: Sharpie Mugs

I fell in love with all of the Sharpie mugs I was seeing on Pinterest and knew I had to make one to celebrate my husband's birthday.  After a bit of trial and error, I learned that Sharpies don't actually work on coffee mugs.  I found great success using a lovely Porcelain pen by a French company, Pebeo, that doesn't smudge or wipe off, even after 30-ish rounds in the dishwasher.  It's the same pen I used on my tile coaster project. 


I drew my beloved's name and colored it in with the porcelain pen, adding doodles of his favorite things and terms of endearment.  I filled the empty spaces with splashes of flowers and hearts.   


A handful of Almond Joy candy bars made the gift complete.  He loves it and uses it every day!


Even if you can't draw, you can write sweet things to express your undying love to that someone special.  I think doodle mugs would be great with signatures to commemorate a graduation or other special event.  The creative juices are flowing!

For tips on how to erase, as well as instructions on setting the ink to make it permanent (you bake it in the oven), check out my tile coaster project.

HAPPY CRAFTING!

~Merrill ♥