January 3, 2016

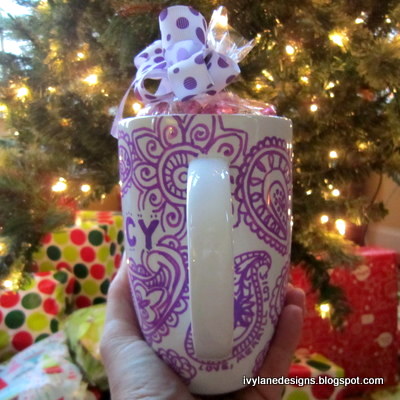
DIY Sharpie Mug in Purple Paisley

I recently had the good fortune to reconnect with a childhood friend.  Nancy is consistently positive and seems to always wear a smile on her face.  She brightens a room just by walking through the door.  I thought I would surprise her with a Sharpie mug.


In the past, I had found great success using a porcelain pen by the French company, Pebeo, that I used to make this mug and this tile coaster.  Since Pebeo doesn't make a paint pen in purple, I turned to Sharpie.  Sharpie makes oil-based markers that reportedly are permanent on nonporous surfaces.  I bought the five-pack of oil-based Sharpies that included purple, as well as blue, green, orange and pink.

Detailed instructions, including baking time, can be found here.  Be sure to only use oil-based and not the regular Sharpie markers.  
  

A cellophane bag filled with chocolates and a purple polka-dotted bow finished the Sharpie mug gift.


If you make a Sharpie mug, let me know!

Happy crafting!

♥ Merrill


November 11, 2015

Bold and Beautiful #11

6" x 6", acrylic on hardboard panel
SOLD
I have had so many requests via my Facebook page for this beauty, I painted a smaller version for purchase.  I love the bright, vibrant colors.  It makes me happy!

6x6, original acrylic painting on hardboard panel.  Watermark is not on the painting, natch.

Enjoy!

♥ Merrill 

July 5, 2015

DIY Kool-Aid or Capri Sun Juice Drink Pouch Tote Bag

Steve Jobs said, "My favorite things in life don't cost any money. It's really clear that the most precious resource we all have is time."

I treasure time spent with my daughter.  Each year on my birthday I ask for the same thing - her time.  We have built a bear, sang, swam, skated, walked, climbed, colored, cooked - and crafted!


In my Ivy Lane Designs shop, my creations are made from materials rescued from trash and recycling bins.   It only then makes sense that our favorite mother-daughter activity would be crafting together, often from recyclables.  

One year when we were apart on her birthday, I sent her balloons in a box - one of my proudest moments in my handmade gift-giving history.

A super fun project is making a tote bag from juice drink pouches.  Here is how we did it.


JUICE DRINK POUCH TOTE BAG

WHAT YOU NEED:

  • 16 drink pouches
  • Nylon webbing for the strap, length is your choice (available at Joann)
  • Scissors
  • A sewing machine
  • Nylon thread
  • Painter's tape (optional, although it does a nice job of keeping the pouches from slipping while you sew)

DIRECTIONS:

1.  Empty and clean your juice pouches.  If you clip the bottom of the pouches, they'll dry faster.

2.  Set your sewing machine to the widest, zig zag stitch available.  A zig zag stitch is stronger, allowing for a more durable bag - and it looks cool!

3.  Overlap the sides of the pouches and sew.  You want to end up with four strips of three.  This will make the front and back of the bag.  


4.  Then sew two rows of threes together.


 Now you have the front and back of the bag.

5.  Zig zag stitch across the top of the two panels to add durability.

6.  Now, add your straps.  Cut two equal length strips of nylon webbing.  Stitch to the inside of each panel.


7.  Now it's time to make the bottom.  Overlap the top and bottom (not sides) of two pouches and sew them together (see picture below). 

8.  Put wrong sides together (silver to silver) and stitch bottom piece to front piece.  Repeat for the back of the bag.


9.  Repeat step #7 to make the two side pieces.  With wrong sides together, stitch side pieces to front, back and bottom of bag.  This is the hardest step.  Don't be afraid to smush the corners.


10.  Snip threads and enjoy your new eco-friendly tote bag!


A variation is to sew the pieces wrong side together.  We like the look of the exposed seams.

A mother's daughter is a treasure.  Enjoy your time together.

♥ Merrill 

February 14, 2015

Happy Valentine's Day!

Happy Valentine's Day, everyone!  Wishing you a day filled with LOVE ... and cake!


♥ Merrill 
P.S.  Scrumptious baked goodies available at Vegan Treats.

December 23, 2014

DIY Glass Photo Ornaments

Around the holidays, we like to give our friends and neighbors a little something to thank them for making the world a better place.  For years, we gifted living Christmas trees.  This year, we made glass photo ornaments.  

Below, you will find examples, as well as a materials list and illustrated instructions so that you can make your own DIY glass photo ornaments.

We made this ornament to celebrate the birth of a good friend's grandson.


 And, several for neighbors ...


What you will need:
  • Glass ornaments.  I used 3-inch ornaments.
  • Resized photo so that the picture lends itself well to a 3-inch circle.  I tweaked mine using Microsoft Publisher, then emailed them to Costco.  I ordered extras to allow for trial and error.
  • A 3-inch hole punch, or a 3-inch template and a pen (I used a 50% off coupon to purchase an EK Tools Circle Scissor Pro at Michaels - Soooo worth it for this project.  If you are making one or two, hand cutting is fine.  More than that, think about buying a three-inch hole punch or this cutter).  
  • Cutting board, if using the EK Tools Circle Scissors Pro
  • Buffalo snow (I found this at AC Moore.  It's nice and sparkly)
  • Funnel
  • Scissors
  • Fishing line
  • Tape
  • Glue - I used my favorite glue that I wrote about HERE. 
  • Two bamboo skewers (chopsticks might work) to straighten out the photo after you've rolled it up and inserted it in your ornament.
  • Colored scrapbook paper for back of ornament (year or sentiment printed, optional but I think adds something)
  • Printer, if adding the year or sentiment
  • Ribbon (grosgrain ribbon works the best - not wired)
  • Silver metallic thread for hanging (optional) 
  • Tags (optional) 
  • Treat boxes, or bags (optional) 

HERE'S HOW TO MAKE YOUR OWN GLASS PHOTO ORNAMENTS (written and illustrated instructions below):

Cut two three-inch circles, one from your photo, one from color-coordinated scrapbook paper.  I printed 2014 on the back of the scrapbook paper.

Use a funnel to put buffalo snow in your ornament.

Cut a piece of fishing line about 12" long.  Tape the center of the line on the bottom of the middle of the photo (see photo below).  Then tape it again at the top.  You will use the fishing line to help position the photo.

Glue the photo circle to the colored scrapbook circle.  

Roll glued circle and insert in ornament.  

Use bamboo skewers to flatten out the circle.  It will be a little like building a ship in a bottle, which I have never actually done but seen on TV.

Poke the ends of the fishing line through the two little holes in the ornament cap.  Tie knot.  Trim ends.

Return cap.

Add ribbon.

Add silver metallic thread for hanging.

Add personalized tag.

Tuck inside gift bag or box.


ILLUSTRATED INSTRUCTIONS:


Happy crafting!

♥ Merrill 


February 14, 2014

DIY :: Conversation Heart Bracelet

My friend Tami makes super cool jewelry.  This Valentine's Day I wanted to surprise her with a bracelet I made in appreciation for the ones she has created for me, like this one and this one.  A conversation heart bracelet from pastel shades of polymer clay was the perfect thing! 

A Sculpey assortment pack in pastel colors is the way to go.  I found this one with free shipping.
Polymer clay colors are easy enough to mix, but I had a time crunch from filling tons of crayon orders so bought light shades of pink, orange, blue, yellow and green.  I forgot purple.  I conditioned the clay by massaging it, rolled it into a ball that I flattened, smashed out the finger prints by using the back of a spatula, punched out little hearts using a fondant cutter from this set, poked holes (use a toothpick or the wire poker that comes with this kit) and stamped T-A-M-I.  I baked the beads at 275°F for 15 minutes.  After they cooled, I strung them with elastic.  Because of that time crunch I mentioned, I then sprayed them with polyurethane.  Spraying before stringing would have been ideal.  My TAMI bracelet was still a little tacky (to the touch, not tacky like, you know) but I placed it in my empty candy box and it was on its way to sunny Florida.


What I learned:  Next time, I will most likely make thicker beads so that I can use a toothpick and heavier elastic.  I will spray the beads before stringing, and will not use an empty conversation heart candy box for packaging.  Even though it seemed like a swell idea at the time, one might confuse the bracelet sound the box makes when shaken, with heart candy.  Or, I will attach a note saying to peek inside for a special surprise.

The little cutters were available on amazon with free shipping.  I used the smallest of the three hearts.

The alphabet stamps can be found here, or at craft stores.  The bead baking rack, although not essential, is super convenient and can be found here.  And, it comes with the wire used to poke holes through the beads.

 Here is the finished bracelet on Tami's lovely wrist.


Happy crafting! 

~Merrill ❤


September 30, 2013

Mother-Daughter Pottery Painting: The Finale

I cherish the time spent with my daughter, so for Mother's Day she and I spent a fun-filled afternoon together painting pottery.  I chose an oatmeal bowl for my husband for Father's Day, as we all know that handmade gifts are the best.  On the bottom I painted MERRILL LOVES BOB because it's so very true.  My daughter painted a funky mug in a patchwork pattern.  HERE is our work in progress. 


My beloved assures me that oatmeal is tastier when eaten from a hand-painted bowl.


Before:


Lauren with her new mug.


Most creative!


~Merrill ♥  

February 28, 2013

Handpainted Armoire

I have always had a thing for handpainted furniture (click HERE for over 100 examples).  It only then made sense to paint an armoire for my daughter to house her Barbie clothes and accessories.  Even though these days she is more interested in writing algorithms than playing with dolls, she and I still love her little house and the memories tucked inside. 

I bought the unfinished armoire at a big craft store and used inexpensive acrylic paint (the bottles that go on sale for three for a dollar).


Happy painting!

~Merrill ♥


December 19, 2012

O Christmas Tree

Over the years, my family has delivered hundreds and hundreds of small living Christmas trees to teachers, therapists, neighbors, family members and friends.  Because our son, Justin, has autism, there have been scads of people who have needed a sign of appreciation at the holidays (and other times, too).  Now that Justin has graduated high school, he no longer has that wonderful support network.  In fact, the lack of accessible services for those with mental health and neurological challenges in the United States is heartbreaking.  If you haven't yet read "I Am Adam Lanza's Mother," you should.  It will take you less than five minutes.  Something must be done.

If you don't like how things are, change it! You're not a [Christmas] tree. - Jim Rohn 

This year, we focused our tree efforts on those who live alone and do not have family members nearby.  These are people who would not likely otherwise have a Christmas tree.


Each package included one live tree, a sparkly frame with a picture of our kids, mini ornaments, ornament hangers, LED battery operated lights and AA batteries.

Small trees are available at nurseries, and even grocery stores.


The mini ornaments and hangers were from Target.


 The battery operated LED lights were also from Target.


If the recipient lived far away, we packed everything inside a free Priority Mail shoe box, available online from the United States Parcel Service HERE, and mailed it.  The USPS will deliver shipping boxes to your home for free.  


This is Justin last year at a nursing home, delivering trees.

 
This holiday season (and throughout the year), surprise someone who needs it.

Merry Christmas! 

~Merrill ♥   

October 12, 2012

Make Hand-Painted Tile Coasters for Only 16¢

What happens when I combine my love of doodling with a night spent on Pinterest?  Hand-painted tiles, of course!  Pinterest showed mugs from Anthropologie.  I opted for personalized tiles.  Inexpensive and super easy!  Two of my favorite things.

If you like to doodle, this is the craft for you!  Embellishing plain tile coasters, or most any dollar store ceramic, would be a great birthday party craft for kids, although adults would no doubt want to jump in and play. 
 

I picked up a bunch of tiles for only 16¢ each during a quick trip to our local Home Depot.  I chose 4 1/4" x 4 1/4" tiles as they are the perfect size for coasters.  


The guy at Home Depot who was helping me showed me his pink flamingo underpants so, of course, I had to take a picture. <winkie face>


Here is what you will need to make hand-painted tile coasters:


MATERIALS

  • Tile
  • Pebeo porcelaine paint pen (Available HERE)
  • Window cleaner and a paper towel
  • Nail polish remover with acetone
  • Q-Tips
  • Carbon paper (available at office supply stores), optional
  • Felt feet (or a square of felt, scissors and glue), optional

Clean your tile using window cleaner. 

Shake pen well before use.  Press tip against a hard surface repeatedly to start ink flow.  I freehanded my design, but feel free to transfer a picture using carbon paper.  If using the carbon paper transfer method, just sandwich the carbon paper between the tile and your picture.  Using a pencil, trace the picture and it will transfer to the tile.  Or, just start drawing!

The nail polish remover and Q-Tips are in case you make a mistake that you would like to erase.  I used nail polish remover then followed up with a quick wipe with window cleaner.


After you have painted your tile, allow it to air dry for 24 hours.  After 24 hours, place tile directly on the middle rack of a cold oven.  Set oven to 300 degrees and bake tile directly on rack for 30 minutes once oven has come up to temp.  Allow tile to cool in oven.  You want to avoid cracking which can be caused by a sudden change in temperature.  


Adding felt feet (found at Home Depot for 2¢ each) is optional, but I like that the coaster won't scratch a wood surface.  If you don't add feet, you can safely wash your coaster in the dishwasher after baking. 

This little tile will be a Christmas gift for my sister who lives in San Francisco.   I hope that she will like it!


If you make hand-painted tile coasters, let me know!

~Merrill ♥