January 3, 2016

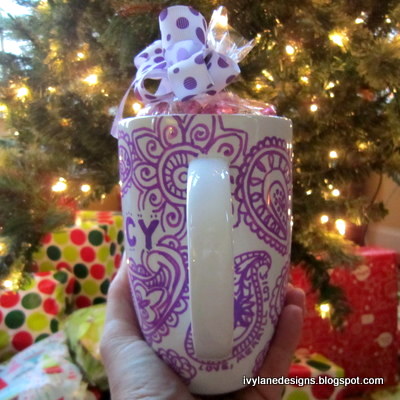
DIY Sharpie Mug in Purple Paisley

I recently had the good fortune to reconnect with a childhood friend.  Nancy is consistently positive and seems to always wear a smile on her face.  She brightens a room just by walking through the door.  I thought I would surprise her with a Sharpie mug.


In the past, I had found great success using a porcelain pen by the French company, Pebeo, that I used to make this mug and this tile coaster.  Since Pebeo doesn't make a paint pen in purple, I turned to Sharpie.  Sharpie makes oil-based markers that reportedly are permanent on nonporous surfaces.  I bought the five-pack of oil-based Sharpies that included purple, as well as blue, green, orange and pink.

Detailed instructions, including baking time, can be found here.  Be sure to only use oil-based and not the regular Sharpie markers.  
  

A cellophane bag filled with chocolates and a purple polka-dotted bow finished the Sharpie mug gift.




If you make a Sharpie mug, let me know!

Happy crafting!

♥ Merrill


November 11, 2015

Bold and Beautiful #11

6" x 6", acrylic on hardboard panel
SOLD
I have had so many requests via my Facebook page for this beauty, I painted a smaller version for purchase.  I love the bright, vibrant colors.  It makes me happy!

6x6, original acrylic painting on hardboard panel.  Watermark is not on the painting, natch.

Enjoy!

♥ Merrill 

July 11, 2015

Painting :: Surprise!

Surprise!  Acrylic on stretched canvas (36x36in.)

My daughter recently moved and asked that I paint something special for her bedroom in her new house.  My instructions were that it be big, with a black background and have bright flowers.  She wanted to be surprised.

I chose to paint a chalkboard-inspired background that really makes the brightly colored flowers pop.  And, it's huge!


Our friend Peggy who, with her husband, owns Barry Davis Produce Stand (be sure to like them on FB), had given Lauren a sunflower.  The sunflower ended up being the focal point of the painting.

  
It was a thrill for me to paint for a specific person, especially my daughter.  She loves her new SURPRISE painting!


I have had so many requests on my Ivy Lane Designs Facebook page for this happy painting, I painted a smaller (6" x 6") version for purchase.  Click HERE for details.

♥ Merrill 

July 5, 2015

DIY Kool-Aid or Capri Sun Juice Drink Pouch Tote Bag

Steve Jobs said, "My favorite things in life don't cost any money. It's really clear that the most precious resource we all have is time."

I treasure time spent with my daughter.  Each year on my birthday I ask for the same thing - her time.  We have built a bear, sang, swam, skated, walked, climbed, colored, cooked - and crafted!


In my Ivy Lane Designs shop, my creations are made from materials rescued from trash and recycling bins.   It only then makes sense that our favorite mother-daughter activity would be crafting together, often from recyclables.  

One year when we were apart on her birthday, I sent her balloons in a box - one of my proudest moments in my handmade gift-giving history.

A super fun project is making a tote bag from juice drink pouches.  Here is how we did it.


JUICE DRINK POUCH TOTE BAG

WHAT YOU NEED:

  • 16 drink pouches
  • Nylon webbing for the strap, length is your choice (available at Joann)
  • Scissors
  • A sewing machine
  • Nylon thread
  • Painter's tape (optional, although it does a nice job of keeping the pouches from slipping while you sew)

DIRECTIONS:

1.  Empty and clean your juice pouches.  If you clip the bottom of the pouches, they'll dry faster.

2.  Set your sewing machine to the widest, zig zag stitch available.  A zig zag stitch is stronger, allowing for a more durable bag - and it looks cool!

3.  Overlap the sides of the pouches and sew.  You want to end up with four strips of three.  This will make the front and back of the bag.  


4.  Then sew two rows of threes together.


 Now you have the front and back of the bag.

5.  Zig zag stitch across the top of the two panels to add durability.

6.  Now, add your straps.  Cut two equal length strips of nylon webbing.  Stitch to the inside of each panel.


7.  Now it's time to make the bottom.  Overlap the top and bottom (not sides) of two pouches and sew them together (see picture below). 

8.  Put wrong sides together (silver to silver) and stitch bottom piece to front piece.  Repeat for the back of the bag.


9.  Repeat step #7 to make the two side pieces.  With wrong sides together, stitch side pieces to front, back and bottom of bag.  This is the hardest step.  Don't be afraid to smush the corners.


10.  Snip threads and enjoy your new eco-friendly tote bag!


A variation is to sew the pieces wrong side together.  We like the look of the exposed seams.

A mother's daughter is a treasure.  Enjoy your time together.

♥ Merrill 

January 23, 2015

Ivy Lane Designs Real Simple Feature

Real Simple magazine included my Valentine's Day conversation heart crayons in their "19 Cute Valentines Day Gifts for Kids."  Who's a HAPPY girl!

Here's what my new friends at Real Simple had to say:  Stamped with messages like “Be Mine” and “True Love,” these handmade heart-shaped crayons are modeled after the classic Valentine’s Day treat. The set of five comes packaged like a box of chocolates—each brightly colored crayon sits in a cupcake liner and looks almost good enough to eat.

Get yours in my Ivy Lane Designs Etsy shop. 


Thanks, Real Simple! ♥


Happy crafting!

♥ Merrill 

December 23, 2014

DIY Glass Photo Ornaments

Around the holidays, we like to give our friends and neighbors a little something to thank them for making the world a better place.  For years, we gifted living Christmas trees.  This year, we made glass photo ornaments.  

Below, you will find examples, as well as a materials list and illustrated instructions so that you can make your own DIY glass photo ornaments.

We made this ornament to celebrate the birth of a good friend's grandson.


 And, several for neighbors ...


What you will need:
  • Glass ornaments.  I used 3-inch ornaments.
  • Resized photo so that the picture lends itself well to a 3-inch circle.  I tweaked mine using Microsoft Publisher, then emailed them to Costco.  I ordered extras to allow for trial and error.
  • A 3-inch hole punch, or a 3-inch template and a pen (I used a 50% off coupon to purchase an EK Tools Circle Scissor Pro at Michaels - Soooo worth it for this project.  If you are making one or two, hand cutting is fine.  More than that, think about buying a three-inch hole punch or this cutter).  
  • Cutting board, if using the EK Tools Circle Scissors Pro
  • Buffalo snow (I found this at AC Moore.  It's nice and sparkly)
  • Funnel
  • Scissors
  • Fishing line
  • Tape
  • Glue - I used my favorite glue that I wrote about HERE. 
  • Two bamboo skewers (chopsticks might work) to straighten out the photo after you've rolled it up and inserted it in your ornament.
  • Colored scrapbook paper for back of ornament (year or sentiment printed, optional but I think adds something)
  • Printer, if adding the year or sentiment
  • Ribbon (grosgrain ribbon works the best - not wired)
  • Silver metallic thread for hanging (optional) 
  • Tags (optional) 
  • Treat boxes, or bags (optional) 

HERE'S HOW TO MAKE YOUR OWN GLASS PHOTO ORNAMENTS (written and illustrated instructions below):

Cut two three-inch circles, one from your photo, one from color-coordinated scrapbook paper.  I printed 2014 on the back of the scrapbook paper.

Use a funnel to put buffalo snow in your ornament.

Cut a piece of fishing line about 12" long.  Tape the center of the line on the bottom of the middle of the photo (see photo below).  Then tape it again at the top.  You will use the fishing line to help position the photo.

Glue the photo circle to the colored scrapbook circle.  

Roll glued circle and insert in ornament.  

Use bamboo skewers to flatten out the circle.  It will be a little like building a ship in a bottle, which I have never actually done but seen on TV.

Poke the ends of the fishing line through the two little holes in the ornament cap.  Tie knot.  Trim ends.

Return cap.

Add ribbon.

Add silver metallic thread for hanging.

Add personalized tag.

Tuck inside gift bag or box.


ILLUSTRATED INSTRUCTIONS:


Happy crafting!

♥ Merrill 


August 1, 2013

A Giraffe Themed First Birthday

Today I worked on creating giraffe-themed party favors to help Kendall (and 40 of her closest friends) celebrate her first birthday.  Kendall's mom wanted giraffe crayon favors in purple and yellow, and the end result was super cute!  By the way, a herd of giraffes is called a tower.  I did not know that.


Nifty giraffe crayons are available HERE in my Ivy Lane Designs Etsy shop.  All of my super duper crayons can be found HERE.


Color on!

 ~Merrill ♥

March 14, 2013

Vintage Baseball Trading Card Journals

I have been busy making one of a kind journals from vintage baseball trading cards for my Ivy Lane Designs Etsy shop.  The cards are filled with history and just too cool to spend their lives in a box under a bed.  Initially, I considered covering a wall in my son's room with baseball memorabilia, but feared it would be too overstimulating (he has autism).  I decided to make journals so the world can see and appreciate the players from our past.


If there is a particular team that you would like as a journal, just let me know.


Play ball!

~Merrill ♥  

February 6, 2013

Crayon Cars :: Vroom Vroom Vroom!

Start your engines!  I am having the best time making these awesome crayon cars for my Ivy Lane Designs shop on Etsy.  The bright colors and cool car shape encourage children's creativity, and they're just downright FUN!  Vroom vroom vroom!  I wish I had these when I was a kid.


Available in gift boxed sets of six HERE:


 Or party packs of twenty HERE:


Happy coloring, and vroom vroom vroom!

~Merrill ♥

February 2, 2013

My Favorite Glue

Once in a awhile I fall so in love with a craft product that I can't keep it to myelf.  My current love affair is with the ZIG 2-way glue pen.  My favorite glue for paper crafting, hands down.  It's wet adhesive that goes down blue and is permanent.  If allowed to dry, it becomes temporary (like a Post-It).  It's not runny and it doesn't make your fingers sticky.  Perfect for card making and scrapbooking. It's available at craft stores.  I bought mine at a Joann store using a coupon, natch.  You can also find it on amazon.com.  {I'm not a paid spokesperson ... just really like this stuff}


They come in different sizes.  For my barnyard crayon boxes, that I fill with paper hay and farm crayons, I use the jumbo tip and the fine tip.  I was able to finish 25 boxes, that will be heading to Mississippi, with one bottle of each and I still have glue left over.

Here's a finished crayon farm box, available at my Etsy shop, Ivy Lane Designs.  It's sure to spark any child's imagination!  Super cute barn, tractor, pig, horse, cow and rooster crayons are tucked inside a hand-decorated farm slider box. Each farm box includes paper hay, and measures appx. 4.75" x 2.6" x 1.25". Each box is a labor of love; a collage created from 16 little pieces of individually cut colored paper. Just the barn alone is comprised of seven separate bits. Read about them HERE. 


Here's a video that tells a little more about my favorite glue. 

Happy crafting!

~Merrill ♥   


December 29, 2012

Repurpose, Reuse, Recycle: Eco-Friendly Map Necklace

Necessity really is the mother of invention.  Finding new uses for old things has always been my thing.  When I was a kid, I would paint rocks and add felt to bring them to life as alligators, or turtles, or ladybugs.  These days I am collecting prescription pill bottles with plans to design a piece of furniture.  [Be sure to watch this space.]

One recent creation from an everyday item is my map necklace, available in my Etsy shop, Ivy Lane Designs, that I crafted from pages of a vintage road atlas.  The necklace currently has over 8,000 views on Etsy, which is quite a lot. 


My map necklace has also been featured on the front page of Etsy several times, which always makes me do a little happy dance.

 
... and it was chosen out of thousands of entries to be a finalist in GOOD Magazine's "Take a Picture of Something Repurposed" challenge. 


Creative repurposing is fun AND eco-friendly!

~Merrill ♥   

December 10, 2012

5,000 Etsy Sales at Ivy Lane Designs

I am proud and delighted to report that today I made my 5,000th sale in my eco-friendly Etsy shop, Ivy Lane Designs.  Pinch me!    


It seemed like not long ago that I was voicing to my beloved how much I was looking forward to reaching 100 sales.  One thousand sounds like a lot, but 5,000 ... WOW!  As a happy-as-a-lark Etsy shop owner, I thank you.  


Be sure to check out all of the eco-friendly goodies, including matchbox party favors (as featured in BRIDES magazine), food journals, drink journals, miscellaneous fun journals, record album journals, the ever-popular recycled crayons and mini jot-and-go journals. 


~Merrill ♥
 

December 5, 2012

What's in a Name? Creativity, of Course!

When a child's name is spelled out in letter crayons, creativity abounds!  I have been working fast and furiously creating kids' chunky handcrafted letter crayons for a teacher in Virginia who ordered them for her entire class! <BIG HUG for teachers!> They are the perfect size for little hands.  

A cellophane bag, shredded recycled (natch) paper, personalized tag and ribbon are included at no additional charge.  Ready for giving.  Colors are representative.  Big letter crayons make the perfect party favor or stocking stuffer!  Brought to you by Ivy Lane Designs on Etsy. 


Size varies by letter. The dimensions of the letter M, for example, are appx.: 1.75" x 1.6" x .7". CHOKING HAZARD-Small parts. Not for children under 3 years.


All eco-friendly crayons from Ivy Lane Designs are handcrafted from repurposed, non-toxic crayons.  It is never too early to teach our children about helping the environment.


Available:  
7, 8 and 9 letter names on request, so don't be shy! <winkie face>

Happy Holidays!

~Merrill ♥