December 23, 2014

DIY Glass Photo Ornaments

Around the holidays, we like to give our friends and neighbors a little something to thank them for making the world a better place.  For years, we gifted living Christmas treesThis year, we made glass photo ornaments.  

Below, you will find examples, as well as a materials list and illustrated instructions so that you can make your own DIY glass photo ornaments.

We made this ornament to celebrate the birth of a good friend's grandson.


 And, several for neighbors ...


What you will need:
  • Glass ornaments.  I used 3-inch ornaments.
  • Resized photo so that the picture lends itself well to a 3-inch circle.  I tweaked mine using Microsoft Publisher, then emailed them to Costco.  I ordered extras to allow for trial and error.
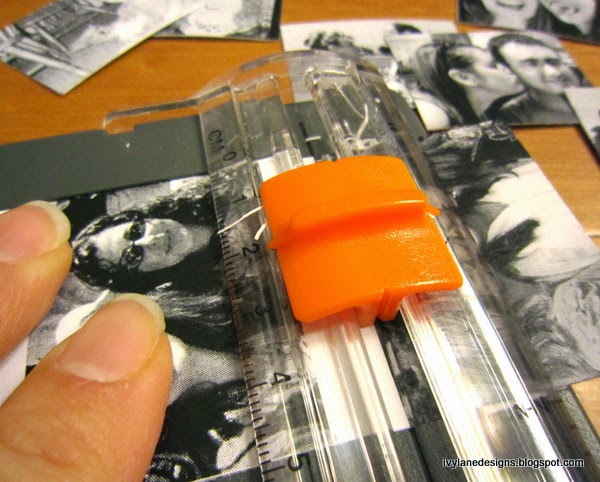
  • A 3-inch hole punch, or a 3-inch template and a pen (I used a 50% off coupon to purchase an EK Tools Circle Scissor Pro at Michaels - Soooo worth it for this project.  If you are making one or two, hand cutting is fine.  More than that, think about buying a three-inch hole punch or this cutter).  
  • Cutting board, if using the EK Tools Circle Scissors Pro
  • Buffalo snow (I found this at AC Moore.  It's nice and sparkly)
  • Funnel
  • Scissors
  • Fishing line
  • Tape
  • Glue - I used my favorite glue that I wrote about HERE
  • Two bamboo skewers (chopsticks might work) to straighten out the photo after you've rolled it up and inserted it in your ornament.
  • Colored scrapbook paper for back of ornament (year or sentiment printed, optional but I think adds something)
  • Printer, if adding the year or sentiment
  • Ribbon (grosgrain ribbon works the best - not wired)
  • Silver metallic thread for hanging (optional) 
  • Tags (optional) 
  • Treat boxes, or bags (optional) 

HERE'S HOW TO MAKE YOUR OWN GLASS PHOTO ORNAMENTS (written and illustrated instructions below):

Cut two three-inch circles, one from your photo, one from color-coordinated scrapbook paper.  I printed 2014 on the back of the scrapbook paper.

Use a funnel to put buffalo snow in your ornament.

Cut a piece of fishing line about 12" long.  Tape the center of the line on the bottom of the middle of the photo (see photo below).  Then tape it again at the top.  You will use the fishing line to help position the photo.

Glue the photo circle to the colored scrapbook circle.  

Roll glued circle and insert in ornament.  

Use bamboo skewers to flatten out the circle.  It will be a little like building a ship in a bottle, which I have never actually done but seen on TV.

Poke the ends of the fishing line through the two little holes in the ornament cap.  Tie knot.  Trim ends.

Return cap.

Add ribbon.

Add silver metallic thread for hanging.

Add personalized tag.

Tuck inside gift bag or box.


ILLUSTRATED INSTRUCTIONS:


Happy crafting!

Merrill 


November 20, 2014

DIY :: Sharpie Mugs

I fell in love with all of the Sharpie mugs I was seeing on Pinterest and knew I had to make one to celebrate my husband's birthday.  After a bit of trial and error, I learned that Sharpies don't actually work on coffee mugs.  I found great success using a lovely Porcelain pen by a French company, Pebeo, that doesn't smudge or wipe off, even after 30-ish rounds in the dishwasher.  It's the same pen I used on my tile coaster project


I drew my beloved's name and colored it in with the porcelain pen, adding doodles of his favorite things and terms of endearment.  I filled the empty spaces with splashes of flowers and hearts.   


A handful of Almond Joy candy bars made the gift complete.  He loves it and uses it every day!


Even if you can't draw, you can write sweet things to express your undying love to that someone special.  I think doodle mugs would be great with signatures to commemorate a graduation or other special event.  The creative juices are flowing!

For tips on how to erase, as well as instructions on setting the ink to make it permanent (you bake it in the oven), check out my tile coaster project.

HAPPY CRAFTING!

~Merrill

August 19, 2014

For You It's Bread, but for Some - It's Life

Yesterday I had the great pleasure of cooking beside a friend, Chef Myke Eggers, who volunteered his time to help prepare the Community Meal at Christ Episcopal Church for those in need through a program sponsored by the Pottstown Cluster.  

We introduced our diners to Indian cuisine.  Chef Myke prepared delicious naan that he baked from scratch.  Naan is a leavened, oven-baked flatbread that is often served with Indian food.


Chef Myke expressed himself beautifully on his Facebook page, that you should follow right now --> HERE


For our entree, we made chicken tikka masala where chunks of chicken are marinated in fragrant spices (coriander and cumin) and yogurt, cooked and served in a creamy tomato sauce over rice.  I adapted my slow cooker recipe found HERE by multiplying the ingredient amounts by 12.  

Chef Myke and my wonderful husband, Bob, prepped the chicken, zucchini (from our backyard garden) and onions.  Iced tea was served, brewed with fresh mint from Chef Myke's garden.


Many returned for seconds, and even thirds. 


Pottstown Cluster board president, Allan Altschull, stopped by to personally thank Chef Myke.


Volunteers make it happen.


Anna and Larissa reminded us to introduce the idea of volunteering at an early age to our children.  Anna (right), who wants to be a cupcake baker when she grows up, baked all of the scrumptious muffins that were served for dessert. 


In the words of Chef Myke,  
"Remember the next time you enjoy your meal to be thankful.  For you it's just bread, but for some - it's life."
No one in our community should go hungry.  Contact the Pottstown Cluster at 610-970-5995 to learn more about how you can help.  

~Merrill

July 22, 2014

Stuffed Zucchini Boats and 6 Other Yummy Zucchini Recipes

This time of year, when our garden is overflowing, we are always in search of delicious and creative ways to prepare zucchini.  This recipe for stuffed zucchini boats hits a home run.  I have my next-door neighbor to thank for the inspiration.  It's super easy and kid-friendly.  Win win! 

On to our stuffed zucchini boats...    


STUFFED ZUCCHINI BOATS

Printer-Friendly Recipe

INGREDIENTS
 
2 large zucchini (or 5 smaller), cut in half, insides scooped out (reserve insides)
1 1/2 cup pearl couscous (sometimes called Israeli couscous)
2 1/2 cups vegetable broth
2 tbsp. olive oil
2 red bell peppers, seeded and diced
3 scallions (green and white parts), diced
1/4 cup portobella mushrooms (or any raw mushrooms you have on hand), diced
1/4 tsp. cayenne
2 tsp. dried parsley
3 tbsp. crumbled feta (you may substitute a dairy-free cheese, like Daiya provolone, for the feta)
2 tbsp. pine nuts, toasted (for topping)
½ tsp. salt, or more to taste (add gradually, thoroughly mixing and tasting each time)
¼ tsp. pepper
Juice of 1 lemon

DIRECTIONS

Preheat oven to 375 degrees.

Add vegetable broth to large pot and bring to a boil.  Add couscous and a pinch of salt to pot.  Reduce to a simmer and cover. Cook 10-15 minutes, until all veggie broth absorbs.

Trim the ends off zucchini.  Cut zucchini in half lengthwise, then scoop out pulp, leaving about 1/2 inch shells.  Finely dice pulp and place in bowl.  Set aside.

Warm a large skillet over medium heat, then add 1 tbsp. olive oil.  Once oil is hot, add red peppers and scallions.  Cook and stir occasionally, until peppers soften, about 8 minutes.  Add remaining 1 tbsp. olive oil, mushrooms and zucchini pulp and cook another 3-5 minutes.  Season with cayenne, parsley, salt and pepper.  Remove from heat, then add couscous and mix.

Heat a small skillet over medium-high heat, then add pine nuts.  Toast until golden brown, flipping pan occasionally, about 3-5 minutes.

Divide couscous mixture evenly among zucchini. Top with crumbled feta and toasted pine nuts.

Line two baking sheets with parchment, or lightly spray the baking sheets with cooking spray. Place zucchini on tray then put in preheated oven for 25 minutes until zucchini softens.  Once cooked through, remove from oven.  Squeeze fresh lemon juice on top of all zucchini.

Serve and enjoy! 

Here are six additional tried and true zucchini recipes:


Fried Zucchini with Creamy Horseradish Dipping Sauce (my favorite!  I could eat the dipping sauce with a spoon! 


Quinoa Casserole with Zucchini (super versatile, and it's vegetarian, or vegan, and gluten-free) 

Panang Curry with Zucchini (you'll never miss the meat)

Fresh Roasted Tomato Pasta Sauce (a great way to use your garden veggies, and freezes nicely)

If you have a zucchini recipe that you love, please share it with me!

Happy cooking,

~Merrill


May 28, 2014

DIY :: How to Make a Photo Strip

Photo craft projects are some of my favorites.  If you are looking for a heartfelt gift for a friend or family member, a handmade photo strip may just do the trick.

Photo strips are a great, inexpensive way to memorialize a wedding, baby's birth, shower, pregnancy, graduation or as a treat on a birthday, Valentine's Day, Mother's Day, Father's Day, an anniversary or Christmas.  The possibilities are endless.  They are super easy to make and, best of all, you can use your home printer. 


What you will need:
  • White card stock, 1 sheet
  • Black card stock (or the color of your choice), 1 sheet
  • Scissors
  • Paper cutter (optional, but makes the job go more quickly)
  • Adhesive (I looooooove this glue)
  • A recycled jewelry gift box, or even a little bag
  • Digital photos
  • Computer
  • Google's Picasa, or other photo editing program
  • Printer


I also used a scoring board that I bought at a local craft store with a coupon.  If you have one, use it, but don't buy it for this project. 


Choose your photos.  This takes the most time.  I selected "save as" and saved each contender in a folder on my desktop.  I then edited each using Picasa, a free program by Google.  You can download it HERE.  It allows you to crop, resize, darken, lighten and convert your photos to black and white, or sepia.

After selecting, editing and printing your photos on white card stock, cut them out so that they are uniform in size.  Place them in a row on your black card stock so that you know how many fit.  Or, you can do math.  Cut out your strip of black card stock and fold it like an accordion, making sure that one photo fits in each frame.  Use glue to adhere your photos; one in each frame.


Your super cool photo strip should look something like this.


Place your fabulous photo strip in a gift box or bag, along with some paper grass, and perhaps a piece of candy and a silly toy.


Wrap with ribbon or baker's twine, add a little note and watch the recipient's face light up with glee when he or she opens their little handmade heartfelt photo strip gift.


For more photo craft ideas, follow my Pinterest board HERE.

Happy crafting!

~Merrill


April 9, 2014

DIY :: How to Make a Photo Card and Envelope

When I learned that my friend Fran was retiring, I knew that "wishing you a long and joyous retirement" written on a store-bought card wasn't going to cut it.  Fran is one of those friends with whom you can share anything without fear of being judged.  She's supportive, kind, considerate, smart, funny and lovely.  I wish everyone a Fran in their lives.


Doodling on envelopes is one of my favorite things, so I started there.  I boosted a photo from Fran's Facebook (right click, save image as) and printed it on my 30-ish-year-old HP LaserJet printer.


I cut strips of paper from scraps and layered them.  First the top strips, then Fran's pic, then the bottom strip. 


I used my very favorite glue that I wrote about HERE.  It doesn't leave a sticky residue on your fingers that gets on everything.  Love it!


I flipped the envelope over and trimmed the ends.


I used the back of our awesome library's book sale flyer and a contrasting paper to cut out two talk bubbles, and added Fran's name and address using my black Pilot B2B pen made from recycled plastic water bottles.  Cool.


I glued down the address bubble, colored in the letters with Sharpies, then added an Equality (natch!) postage stamp with a contrasting paper border background.  Voila!


For the card, I used the same techniques, but opted for a color photo.


Fran loved her handmade celebratory card and envelope, and I love Fran!


Happy crafting!

~Merrill

February 14, 2014

DIY :: Conversation Heart Bracelet

My friend Tami makes super cool jewelry.  This Valentine's Day I wanted to surprise her with a bracelet I made in appreciation for the ones she has created for me, like this one and this one.  A conversation heart bracelet from pastel shades of polymer clay was the perfect thing! 

A Sculpey assortment pack in pastel colors is the way to go.  I found this one with free shipping.
Polymer clay colors are easy enough to mix, but I had a time crunch from filling tons of crayon orders so bought light shades of pink, orange, blue, yellow and green.  I forgot purple.  I conditioned the clay by massaging it, rolled it into a ball that I flattened, smashed out the finger prints by using the back of a spatula, punched out little hearts using a fondant cutter from this set, poked holes (use a toothpick or the wire poker that comes with this kit) and stamped T-A-M-I.  I baked the beads at 275°F for 15 minutes.  After they cooled, I strung them with elastic.  Because of that time crunch I mentioned, I then sprayed them with polyurethane.  Spraying before stringing would have been ideal.  My TAMI bracelet was still a little tacky (to the touch, not tacky like, you know) but I placed it in my empty candy box and it was on its way to sunny Florida.


What I learned:  Next time, I will most likely make thicker beads so that I can use a toothpick and heavier elastic.  I will spray the beads before stringing, and will not use an empty conversation heart candy box for packaging.  Even though it seemed like a swell idea at the time, one might confuse the bracelet sound the box makes when shaken, with heart candy.  Or, I will attach a note saying to peek inside for a special surprise.

The little cutters were available on amazon with free shipping.  I used the smallest of the three hearts.

The alphabet stamps can be found here, or at craft stores.  The bead baking rack, although not essential, is super convenient and can be found here.  And, it comes with the wire used to poke holes through the beads.

 Here is the finished bracelet on Tami's lovely wrist.


Happy crafting! 

~Merrill


January 30, 2014

Better Than Panera Vegan Black Bean Pumpkin Soup

I love black bean soup!  Today I took a break from making super cute heart-shaped memory matching games to whip up a double batch of my Better Than Panera Vegan Black Bean Soup.  With the addition of pumpkin, it really is the best black bean soup recipe ever.  And, it's gluten-free!  This soup is in our regular dinner rotation, we like it THAT much.


The cutie pie heart memory matching games I have been working on today can be found in my Ivy Lane Designs Etsy shop:  HERE.


BETTER THAN PANERA VEGAN BLACK BEAN SOUP

Printer-Friendly Recipe

INGREDIENTS

3 - 15 1/2 ounce cans black beans, rinsed and drained
1 - 15 1/2 ounce can drained canned tomatoes

1 1/4 cups chopped onion
4 garlic cloves minced (Tip:  I use the stuff in the jar)
2 tablespoons ground cumin
1 teaspoon salt
1/2 teaspoon freshly ground black pepper
1/4 stick (2 tablespoons) Earth Balance butter
4 cups vegetable broth
1 - 16-ounce can pumpkin pureé (about 1 1/2 cups)
1/2 cup dry Sherry


DIRECTIONS 


Using a food processor, coarsely pureé black beans and tomatoes.  In a large pot, cook onion, garlic, cumin, salt and pepper in Earth balance butter over medium-high heat, stirring until onion is softened and beginning to brown.  Stir in bean pureé.  Stir in veggie broth, pumpkin and Sherry until combined and simmer, uncovered, stirring occasionally for 30 minutes.
 
Taste.  Season soup with salt and pepper.  Taste again.  Serve with a dollop of Tofutti sour cream and crusty bread.

This is even better the second day.  I plan to make a big pot to take to a Lenten supper at our church.

Enjoy!

~Merrill


January 27, 2014

5 Fabulous Costco Favorites

Costco is one of our favorite shopping meccas.  In one stop, we can get our eyeglasses adjusted quickly and for free (and, everyone in the optical department knows Justin, who has autism, by name!), bump into friends, enjoy an inexpensive lunch and pick up most everything we need (plus some!) for the week ahead.

Here are five favorites from our weekend haul.


1.  Sweet Kale Salad.  I love this salad and have it for lunch at least once a week.  Each bag contains broccoli, Brussels (which is plural ... I did not know that) sprouts, cabbage, kale and chicory, with dried cranberries, roasted pumpkin seeds and poppyseed dressing.  Yum!

 
 2.  Silk Pure Almond Milk.  Vegan and gluten-free.  We use this, and the wild blueberries below, in our cereal every morning.  A good price.


3.  Sabra Roasted Pine Nut Hummus.  Vegan and gluten-free.  Quick and easy healthy snack, as a dip with cut up veggies or with black bean and quinoa tortilla chips, also from Costco, natch!  It makes a nice spread for sandwiches, in place of mayonnaise.


4.  Vegetarian Stuffed Grape Leaves.  These are also vegan, which is perfect for my husband.  I am hobbling along the vegan path, with cheese remaining my downfall.  I am convinced that there really is such a thing as a cheese addiction.  Cheese and super spicy food.  These grape leaves are handmade and stuffed with seasoned rice, tomatoes, onions and red peppers.  We enjoy having them for dinner with a salad.  Yummy and 0g saturated fat and trans fat.  Oh, and they're gluten-free.


5.  Wyman's of Maine Wild Blueberries.  We visited Maine last summer where we celebrated our wedding anniversary while falling in love with their wild blueberries.  Every morning these top our cereal.


Happy shopping!

~Merrill