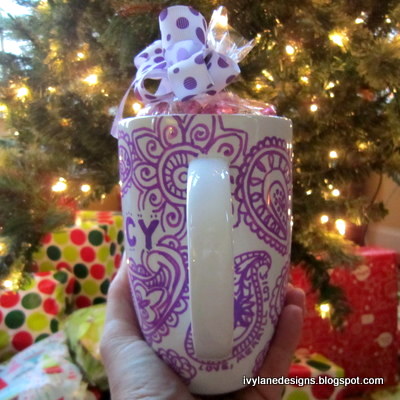
I recently had the good fortune to reconnect with a childhood friend. Nancy is consistently positive and seems to always wear a smile on her face. She brightens a room just by walking through the door. I thought I would surprise her with a Sharpie mug.
In the past, I had found great success using a porcelain pen by the French company, Pebeo, that I used to make this mug and this tile coaster. Since Pebeo doesn't make a paint pen in purple, I turned to Sharpie. Sharpie makes oil-based markers that reportedly are permanent on nonporous surfaces. I bought the five-pack of oil-based Sharpies that included purple, as well as blue, green, orange and pink.
Detailed instructions, including baking time, can be found here. Be sure to only use oil-based and not the regular Sharpie markers.
A cellophane bag filled with chocolates and a purple polka-dotted bow finished the Sharpie mug gift.
If you make a Sharpie mug, let me know!
Happy crafting!
♥ Merrill
Surprise! Acrylic on stretched canvas (36x36in.)
My daughter recently moved and asked that I paint something special for her bedroom in her new
house. My instructions were that it be big, with a black
background and have bright flowers. She wanted to be surprised.
I chose to paint a chalkboard-inspired background that really makes the brightly colored flowers pop. And, it's huge!
Our friend Peggy who, with her husband, owns Barry Davis Produce Stand (be sure to like them on FB), had given Lauren a sunflower. The sunflower ended up being the focal point of the painting.
It was a thrill for me to paint for a specific person, especially my daughter. She loves her new SURPRISE painting!
I have had so many requests on my Ivy Lane Designs Facebook page for this happy painting, I painted a smaller (6" x 6") version for purchase. Click HERE for details.
♥ Merrill
My style of decorating is always evolving. I move on and grow and change. But one thing is constant and that is my love of art. On a weekend trip along the eastern shore of the Chesapeake Bay in a tiny town in Maryland, I happened upon a painting of a sea captain. He was down a narrow alley, displayed on the side of a building. I knew immediately that he had to be mine.
He seemed to be saying, "Avast, ye salty sea dog! Take me home." So, I did.
Now, he watches me shower, which is only a little creepy, and seems to have adjusted well to his new home.
Personal style is a journey - not a destination. One that takes a lifetime.
♥ Merrill
Around the holidays, we like to give our friends and neighbors a little something to thank them for making the world a better place. For years, we gifted living Christmas trees. This year, we made glass photo ornaments.
Below, you will find examples, as well as a materials list and illustrated instructions so that you can make your own DIY glass photo ornaments.
We made this ornament to celebrate the birth of a good friend's grandson.
And, several for neighbors ...
What you will need:
- Glass ornaments. I used 3-inch ornaments.
- Resized photo so
that the picture lends itself well to a 3-inch circle. I tweaked mine using Microsoft Publisher, then emailed them to Costco. I ordered extras to allow for trial and error.
- A 3-inch hole punch, or a 3-inch template and a pen (I used a 50% off coupon to purchase an EK Tools Circle Scissor Pro at Michaels - Soooo worth it for this project. If you are making one or two, hand cutting is fine. More than that, think about buying a three-inch hole punch or this cutter).
- Cutting board, if using the EK Tools Circle Scissors Pro
- Buffalo snow (I found this at AC Moore. It's nice and sparkly)
- Funnel
- Scissors
- Fishing line
- Tape
- Glue - I used my favorite glue that I wrote about HERE.
- Two bamboo skewers (chopsticks might work) to straighten out the photo after you've rolled it up and inserted it in your ornament.
- Colored scrapbook paper for back of ornament (year or sentiment printed, optional but I think adds something)
- Printer, if adding the year or sentiment
- Ribbon (grosgrain ribbon works the best - not wired)
- Silver metallic thread for hanging (optional)
- Tags (optional)
- Treat boxes, or bags (optional)

HERE'S HOW TO MAKE YOUR OWN GLASS PHOTO ORNAMENTS (written and illustrated instructions below):
Cut two three-inch circles, one from your photo, one from color-coordinated scrapbook paper. I printed 2014 on the back of the scrapbook paper.
Use a funnel to put buffalo snow in your ornament.
Cut a piece of fishing line about 12" long. Tape the center of the line on the bottom of the middle of the photo (see photo below). Then tape it again at the top. You will use the fishing line to help position the photo.
Glue the photo circle to the colored scrapbook circle.
Roll glued circle and insert in ornament.
Use bamboo skewers to flatten out the circle. It will be a little like building a ship in a bottle, which I have never actually done but seen on TV.
Poke the ends of the fishing line through the two little holes in the ornament cap. Tie knot. Trim ends.
Return cap.
Add ribbon.
Add silver metallic thread for hanging.
Add personalized tag.
Tuck inside gift bag or box.
ILLUSTRATED INSTRUCTIONS:
Happy crafting!
♥ Merrill
What happens when I combine my love of doodling with a night spent on Pinterest? Hand-painted tiles, of course! Pinterest showed mugs from Anthropologie. I opted for personalized tiles. Inexpensive and super easy! Two of my favorite things.
If you like to doodle, this is the craft for you! Embellishing plain tile coasters, or most any dollar store ceramic, would be a great birthday party craft for kids, although adults would no doubt want to jump in and play.
I picked up a bunch of tiles for only 16¢ each during a quick trip to our local Home Depot. I chose 4 1/4" x 4 1/4" tiles as they are the perfect size for coasters.
The guy at Home Depot who was helping me showed me his pink flamingo underpants so, of course, I had to take a picture. <winkie face>
Here is what you will need to make hand-painted tile coasters:
MATERIALS
- Tile
- Pebeo porcelaine paint pen (Available HERE)
- Window cleaner and a paper towel
- Nail polish remover with acetone
- Q-Tips
- Carbon paper (available at office supply stores), optional
- Felt feet (or a square of felt, scissors and glue), optional
Clean your tile using window cleaner.
Shake pen well before use. Press tip against a hard surface repeatedly to start ink flow. I freehanded my design, but feel free to transfer a picture using carbon paper. If using the carbon paper transfer method, just sandwich the carbon paper between the tile and your picture. Using a pencil, trace the picture and it will transfer to the tile. Or, just start drawing!
The nail polish remover and Q-Tips are in case you make a mistake that you would like to erase. I used nail polish remover then followed up with a quick wipe with window cleaner.
After you have painted your tile, allow it to air dry for 24 hours. After 24 hours, place tile directly on the middle rack of a cold oven. Set oven to 300 degrees and bake tile directly on rack for 30 minutes once oven has come up to temp. Allow tile to cool in oven. You want to avoid cracking which can be caused by a sudden change in temperature.
Adding
felt feet (found at Home Depot for 2¢ each)
is optional, but I
like that the coaster won't scratch a wood surface. If you don't add
feet, you can safely wash your coaster in the dishwasher after baking.
This little tile will be a Christmas gift for my sister who lives in San Francisco. I hope that she will like it!
If you make hand-painted tile coasters, let me know!
~Merrill ♥
A new baby ... exciting times! My near and dear friend Susan, who you read about HERE and HERE, enlisted my help in creating shower invitations to celebrate the birth of her grandchild, Buster (in utero nickname). My only instructions were to not make anything babyish.
The scrap paper aisle of a local craft store served as inspiration and aided in defining my color palate.
Since we knew the baby was a boy, I chose muted shades of blue, yellow, green, peach and a touch of red. I enlisted the help of my lovely daughter, Lauren, and together we cut out hundreds and hundreds and hundreds of flower shapes. We didn't stick to just scrapbook paper but used maps, vellum, graph paper and pages from old books.
We then scored each piece so that the petals curved up a bit and looked more natural. We used this scoring board which is available HERE, among many other places.
After scoring each piece, we stacked them based on color and shape preference, punched a hold in the center and added a brad like the ones pictured HERE.
The finished product was pretty spectacular! The invitations fit nicely in the greeting card envelopes that I bought HERE. I used a fancy font to address the envelopes and ran them through the printer. Extra postage was required for mailing.
There is a little more to this story in that Baby Buster arrived early so the shower had to be postponed. Another time...
Here is my creative daughter Lauren and great friend *Grandma* Susan.
Click HERE to check out all of the goodies in my Ivy Lane Etsy shop, all made from recyclables.
~Merrill ♥
It's time to bump that living room redesign up the to-do list. My motivation? Fabulous Paris map wallpaper that I spotted on my friend Katherine's Pinterest board. You read about Katherine HERE. I am not typically a fan of wallpaper, but this stuff is pretty awesome. My plan is for the room to be black and off-white. The Paris wallpaper would accent the wall behind my nonexistent sofa.
I have my hopes set high for a knockoff Pottery Barn sofa that will be easier on the wallet than the real thing. No luck as of yet, but I remain confident. If it were to look something like this one, I would be gai comme un pinson (as happy as a lark).
Huntington Beige by Benjamin Moore would be the couleur
parfaite (perfect color) for the remaining three living room walls.
Thoughts of Paris would not be complete without mention of the Eiffel Tower. Eiffel Tower recycled crayon sets of twenty (20) are available in my Etsy shop HERE (assorted colors) and HERE (black and pink). Ils sont parfait!
Mini jot-and-go Je t'aime (I love you) journals made from recycled paper are available HERE (pink and white) and HERE (black and white).
Here is a snapshot from our girls' trip to Paris in celebration of my mother's 70th birthday. If you can, take your mother to Paris before it's too late. She will love it and will cherish the memories always.
Au revoir,
~Merrill ♥

 DIY Sharpie Mug in Purple Paisley