January 3, 2016

DIY Sharpie Mug in Purple Paisley

I recently had the good fortune to reconnect with a childhood friend.  Nancy is consistently positive and seems to always wear a smile on her face.  She brightens a room just by walking through the door.  I thought I would surprise her with a Sharpie mug.


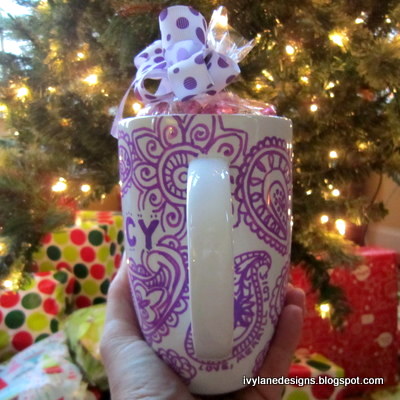
In the past, I had found great success using a porcelain pen by the French company, Pebeo, that I used to make this mug and this tile coaster.  Since Pebeo doesn't make a paint pen in purple, I turned to Sharpie.  Sharpie makes oil-based markers that reportedly are permanent on nonporous surfaces.  I bought the five-pack of oil-based Sharpies that included purple, as well as blue, green, orange and pink.

Detailed instructions, including baking time, can be found here.  Be sure to only use oil-based and not the regular Sharpie markers.  
  

A cellophane bag filled with chocolates and a purple polka-dotted bow finished the Sharpie mug gift.


If you make a Sharpie mug, let me know!

Happy crafting!

Merrill


July 5, 2015

DIY Kool-Aid or Capri Sun Juice Drink Pouch Tote Bag

Steve Jobs said, "My favorite things in life don't cost any money. It's really clear that the most precious resource we all have is time."

I treasure time spent with my daughter.  Each year on my birthday I ask for the same thing - her time.  We have built a bear, sang, swam, skated, walked, climbed, colored, cooked - and crafted!


In my Ivy Lane Designs shop, my creations are made from materials rescued from trash and recycling bins.   It only then makes sense that our favorite mother-daughter activity would be crafting together, often from recyclables.  

One year when we were apart on her birthday, I sent her balloons in a box - one of my proudest moments in my handmade gift-giving history.

A super fun project is making a tote bag from juice drink pouches.  Here is how we did it.


JUICE DRINK POUCH TOTE BAG

WHAT YOU NEED:

  • 16 drink pouches
  • Nylon webbing for the strap, length is your choice (available at Joann)
  • Scissors
  • A sewing machine
  • Nylon thread
  • Painter's tape (optional, although it does a nice job of keeping the pouches from slipping while you sew)

DIRECTIONS:

1.  Empty and clean your juice pouches.  If you clip the bottom of the pouches, they'll dry faster.

2.  Set your sewing machine to the widest, zig zag stitch available.  A zig zag stitch is stronger, allowing for a more durable bag - and it looks cool!

3.  Overlap the sides of the pouches and sew.  You want to end up with four strips of three.  This will make the front and back of the bag.  


4.  Then sew two rows of threes together.


 Now you have the front and back of the bag.

5.  Zig zag stitch across the top of the two panels to add durability.

6.  Now, add your straps.  Cut two equal length strips of nylon webbing.  Stitch to the inside of each panel.


7.  Now it's time to make the bottom.  Overlap the top and bottom (not sides) of two pouches and sew them together (see picture below). 

8.  Put wrong sides together (silver to silver) and stitch bottom piece to front piece.  Repeat for the back of the bag.


9.  Repeat step #7 to make the two side pieces.  With wrong sides together, stitch side pieces to front, back and bottom of bag.  This is the hardest step.  Don't be afraid to smush the corners.


10.  Snip threads and enjoy your new eco-friendly tote bag!


A variation is to sew the pieces wrong side together.  We like the look of the exposed seams.

A mother's daughter is a treasure.  Enjoy your time together.

Merrill 

December 23, 2014

DIY Glass Photo Ornaments

Around the holidays, we like to give our friends and neighbors a little something to thank them for making the world a better place.  For years, we gifted living Christmas treesThis year, we made glass photo ornaments.  

Below, you will find examples, as well as a materials list and illustrated instructions so that you can make your own DIY glass photo ornaments.

We made this ornament to celebrate the birth of a good friend's grandson.


 And, several for neighbors ...


What you will need:
  • Glass ornaments.  I used 3-inch ornaments.
  • Resized photo so that the picture lends itself well to a 3-inch circle.  I tweaked mine using Microsoft Publisher, then emailed them to Costco.  I ordered extras to allow for trial and error.
  • A 3-inch hole punch, or a 3-inch template and a pen (I used a 50% off coupon to purchase an EK Tools Circle Scissor Pro at Michaels - Soooo worth it for this project.  If you are making one or two, hand cutting is fine.  More than that, think about buying a three-inch hole punch or this cutter).  
  • Cutting board, if using the EK Tools Circle Scissors Pro
  • Buffalo snow (I found this at AC Moore.  It's nice and sparkly)
  • Funnel
  • Scissors
  • Fishing line
  • Tape
  • Glue - I used my favorite glue that I wrote about HERE
  • Two bamboo skewers (chopsticks might work) to straighten out the photo after you've rolled it up and inserted it in your ornament.
  • Colored scrapbook paper for back of ornament (year or sentiment printed, optional but I think adds something)
  • Printer, if adding the year or sentiment
  • Ribbon (grosgrain ribbon works the best - not wired)
  • Silver metallic thread for hanging (optional) 
  • Tags (optional) 
  • Treat boxes, or bags (optional) 

HERE'S HOW TO MAKE YOUR OWN GLASS PHOTO ORNAMENTS (written and illustrated instructions below):

Cut two three-inch circles, one from your photo, one from color-coordinated scrapbook paper.  I printed 2014 on the back of the scrapbook paper.

Use a funnel to put buffalo snow in your ornament.

Cut a piece of fishing line about 12" long.  Tape the center of the line on the bottom of the middle of the photo (see photo below).  Then tape it again at the top.  You will use the fishing line to help position the photo.

Glue the photo circle to the colored scrapbook circle.  

Roll glued circle and insert in ornament.  

Use bamboo skewers to flatten out the circle.  It will be a little like building a ship in a bottle, which I have never actually done but seen on TV.

Poke the ends of the fishing line through the two little holes in the ornament cap.  Tie knot.  Trim ends.

Return cap.

Add ribbon.

Add silver metallic thread for hanging.

Add personalized tag.

Tuck inside gift bag or box.


ILLUSTRATED INSTRUCTIONS:


Happy crafting!

Merrill 


May 28, 2014

DIY :: How to Make a Photo Strip

Photo craft projects are some of my favorites.  If you are looking for a heartfelt gift for a friend or family member, a handmade photo strip may just do the trick.

Photo strips are a great, inexpensive way to memorialize a wedding, baby's birth, shower, pregnancy, graduation or as a treat on a birthday, Valentine's Day, Mother's Day, Father's Day, an anniversary or Christmas.  The possibilities are endless.  They are super easy to make and, best of all, you can use your home printer. 


What you will need:
  • White card stock, 1 sheet
  • Black card stock (or the color of your choice), 1 sheet
  • Scissors
  • Paper cutter (optional, but makes the job go more quickly)
  • Adhesive (I looooooove this glue)
  • A recycled jewelry gift box, or even a little bag
  • Digital photos
  • Computer
  • Google's Picasa, or other photo editing program
  • Printer


I also used a scoring board that I bought at a local craft store with a coupon.  If you have one, use it, but don't buy it for this project. 


Choose your photos.  This takes the most time.  I selected "save as" and saved each contender in a folder on my desktop.  I then edited each using Picasa, a free program by Google.  You can download it HERE.  It allows you to crop, resize, darken, lighten and convert your photos to black and white, or sepia.

After selecting, editing and printing your photos on white card stock, cut them out so that they are uniform in size.  Place them in a row on your black card stock so that you know how many fit.  Or, you can do math.  Cut out your strip of black card stock and fold it like an accordion, making sure that one photo fits in each frame.  Use glue to adhere your photos; one in each frame.


Your super cool photo strip should look something like this.


Place your fabulous photo strip in a gift box or bag, along with some paper grass, and perhaps a piece of candy and a silly toy.


Wrap with ribbon or baker's twine, add a little note and watch the recipient's face light up with glee when he or she opens their little handmade heartfelt photo strip gift.


For more photo craft ideas, follow my Pinterest board HERE.

Happy crafting!

~Merrill


April 9, 2014

DIY :: How to Make a Photo Card and Envelope

When I learned that my friend Fran was retiring, I knew that "wishing you a long and joyous retirement" written on a store-bought card wasn't going to cut it.  Fran is one of those friends with whom you can share anything without fear of being judged.  She's supportive, kind, considerate, smart, funny and lovely.  I wish everyone a Fran in their lives.


Doodling on envelopes is one of my favorite things, so I started there.  I boosted a photo from Fran's Facebook (right click, save image as) and printed it on my 30-ish-year-old HP LaserJet printer.


I cut strips of paper from scraps and layered them.  First the top strips, then Fran's pic, then the bottom strip. 


I used my very favorite glue that I wrote about HERE.  It doesn't leave a sticky residue on your fingers that gets on everything.  Love it!


I flipped the envelope over and trimmed the ends.


I used the back of our awesome library's book sale flyer and a contrasting paper to cut out two talk bubbles, and added Fran's name and address using my black Pilot B2B pen made from recycled plastic water bottles.  Cool.


I glued down the address bubble, colored in the letters with Sharpies, then added an Equality (natch!) postage stamp with a contrasting paper border background.  Voila!


For the card, I used the same techniques, but opted for a color photo.


Fran loved her handmade celebratory card and envelope, and I love Fran!


Happy crafting!

~Merrill

February 14, 2014

DIY :: Conversation Heart Bracelet

My friend Tami makes super cool jewelry.  This Valentine's Day I wanted to surprise her with a bracelet I made in appreciation for the ones she has created for me, like this one and this one.  A conversation heart bracelet from pastel shades of polymer clay was the perfect thing! 

A Sculpey assortment pack in pastel colors is the way to go.  I found this one with free shipping.
Polymer clay colors are easy enough to mix, but I had a time crunch from filling tons of crayon orders so bought light shades of pink, orange, blue, yellow and green.  I forgot purple.  I conditioned the clay by massaging it, rolled it into a ball that I flattened, smashed out the finger prints by using the back of a spatula, punched out little hearts using a fondant cutter from this set, poked holes (use a toothpick or the wire poker that comes with this kit) and stamped T-A-M-I.  I baked the beads at 275°F for 15 minutes.  After they cooled, I strung them with elastic.  Because of that time crunch I mentioned, I then sprayed them with polyurethane.  Spraying before stringing would have been ideal.  My TAMI bracelet was still a little tacky (to the touch, not tacky like, you know) but I placed it in my empty candy box and it was on its way to sunny Florida.


What I learned:  Next time, I will most likely make thicker beads so that I can use a toothpick and heavier elastic.  I will spray the beads before stringing, and will not use an empty conversation heart candy box for packaging.  Even though it seemed like a swell idea at the time, one might confuse the bracelet sound the box makes when shaken, with heart candy.  Or, I will attach a note saying to peek inside for a special surprise.

The little cutters were available on amazon with free shipping.  I used the smallest of the three hearts.

The alphabet stamps can be found here, or at craft stores.  The bead baking rack, although not essential, is super convenient and can be found here.  And, it comes with the wire used to poke holes through the beads.

 Here is the finished bracelet on Tami's lovely wrist.


Happy crafting! 

~Merrill


November 6, 2013

Birthday Balloons in a Box

Birthdays are a big deal in our house.  So when the birthday girl is a college student and not in the house, the party goes to the girl.  I mailed this huge box to my daughter at school, with each birthday balloon containing a special surprise.


The balloons were filled with money (rolled up bills), gum, erasers, mascara, bubbles, a ninja, a mustache, candy, pens, a crazy straw, lip gloss and more.


I used 9-inch and 12-inch round balloons from a party store as they were thicker than those I first tried from the dollar store.  The 9-inch were perfect for rolled up bills, and the 12-inch, with patience, worked for the small toys.  The ninja was the toughest, but everyone should have a ninja in their life.


I taped a safety pin inside her card for ease of popping.


Her Facebook post.


Happy birthday, Sweet Pea!


~Merrill