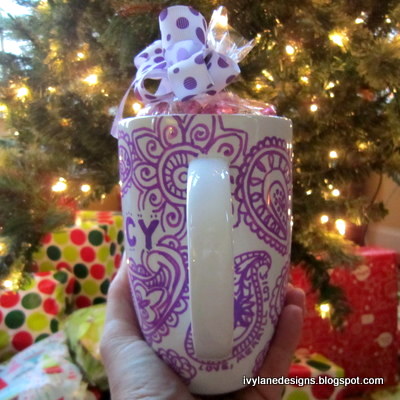
I recently had the good fortune to reconnect with a childhood friend. Nancy is consistently positive and seems to always wear a smile on her face. She brightens a room just by walking through the door. I thought I would surprise her with a Sharpie mug.
In the past, I had found great success using a porcelain pen by the French company, Pebeo, that I used to make this mug and this tile coaster. Since Pebeo doesn't make a paint pen in purple, I turned to Sharpie. Sharpie makes oil-based markers that reportedly are permanent on nonporous surfaces. I bought the five-pack of oil-based Sharpies that included purple, as well as blue, green, orange and pink.
Detailed instructions, including baking time, can be found here. Be sure to only use oil-based and not the regular Sharpie markers.
A cellophane bag filled with chocolates and a purple polka-dotted bow finished the Sharpie mug gift.
If you make a Sharpie mug, let me know!
Happy crafting!
♥ Merrill
I fell in love with all of the Sharpie mugs I was seeing on Pinterest and knew I had to make one to celebrate my husband's birthday. After a bit of trial and error, I learned that Sharpies don't actually work on coffee mugs. I found great success using a lovely Porcelain pen by a French company, Pebeo, that doesn't smudge or wipe off, even after 30-ish rounds in the dishwasher. It's the same pen I used on my tile coaster project.
I drew my beloved's name and colored it in with the porcelain pen, adding doodles of his favorite things and terms of endearment. I filled the empty spaces with splashes of flowers and hearts.
A handful of Almond Joy candy bars made the gift complete. He loves it and uses it every day!
Even if you can't draw, you can write sweet things to express your undying love to that someone special. I think doodle mugs would be great with signatures to commemorate a graduation or other special event. The creative juices are flowing!
For tips on how to erase, as well as instructions on setting the ink to make it permanent (you bake it in the oven), check out my tile coaster project.
HAPPY CRAFTING!
~Merrill ♥
When I learned that my friend Fran was retiring, I knew that "wishing you a long and joyous retirement" written on a store-bought card wasn't going to cut it. Fran is one of those friends with whom you can share anything without fear of being judged. She's supportive, kind, considerate, smart, funny and lovely. I wish everyone a Fran in their lives.
Doodling on envelopes is one of my favorite things, so I started there. I boosted a photo from Fran's Facebook (right click, save image as) and printed it on my 30-ish-year-old HP LaserJet printer.
I cut strips of paper from scraps and layered them. First the top strips, then Fran's pic, then the bottom strip.
I used my very favorite glue that I wrote about HERE. It doesn't leave a sticky residue on your fingers that gets on everything. Love it!
I flipped the envelope over and trimmed the ends.
I used the back of our awesome library's book sale flyer and a contrasting paper to cut out two talk bubbles, and added Fran's name and address using my black Pilot B2B pen made from recycled plastic water bottles. Cool.
I glued down the address bubble, colored in the letters with Sharpies, then added an Equality (natch!) postage stamp with a contrasting paper border background. Voila!
For the card, I used the same techniques, but opted for a color photo.
Fran loved her handmade celebratory card and envelope, and I love Fran!
Happy crafting!
~Merrill ♥
This cute handmade card is super easy and serves as the perfect token of thanks for that special gift. When the gift is handmade, I especially like to return the kind gesture with a handmade thank you card. Hand-stitched cards are also great for birthdays, Christmas ... any celebration!
For my birthday, I received a special surprise from my jewelry designer friend, Tami, of a beautiful handmade necklace and bracelet. She even made the beads from paper that was originally sunflowers. Knowing that I am wearing sunflowers brightens my day! What a clever idea.
HOW-TO MAKE HAND-STITCHED CARDS
Materials Needed:
Embroidery Floss in color/s of your choice
Needle
Pencil, or computer, printer and tape
Scissors
1 sheet cardstock
Envelope
1. Cut your cardstock to size. I cut mine to 8.5 x 5.5" (then folded it in half so the finished size was 4.25 x 5.5).
2. Either use a pencil to lightly draw your word or words, or use the computer method. Because I forgot how to write in cursive sometime during sixth grade, I found a cursive font I liked (EnglishScriptEF for me) and typed out Tami. I resized it to be 100 pts. If using the computer method, print it, cut it out and use painter's tape (if you have it, if not use tiny pieces of any tape) to adhere it to the front of your card.
3. Using an embroidery needle, punch holes around each letter.
4. Using embroidery floss (I used three of the six strands, but you can use all six if you would like a thicker line), use a backstitch to sew around each letter. To make a backstitch, first tie a knot in one end and stick your needle up through hole 1 on backside of the card. Then go down through hole 2. Come up through hole 3. Go down through hole 2. It will soon make sense as to why it's called the backstitch.
Next time, I think I will use a little button for the dot over the letter I.
I like to doodle on my envelopes. This one got a flying monkey and some tattoo lettering.
Here is my awesome new sunflower necklace and bracelet, courtesy of Tami. There have been whisperings about her opening an Etsy shop, so stand by for breaking news!
~Merrill ♥
When my daughter asked that I draw a mountain hawk dancing Gangnam Style, how could I say no? True Love. ♥ She and her honor fraternity wanted to have T-shirts printed for a fundraiser that incorporated their mascot, the mountain hawk, dancing Lehigh Style.
Gangnam Style is a hugely popular single by South Korean rapper Psy and at last count the music video had 483,277,743 hits on YouTube. On September 20, 2012, Gangnam Style was recognized by the Guinness Book of World Records as the most 'liked' video in YouTube history.
Here is the making of:
Oppa Gangnam Style.
~Merrill ♥
What happens when I combine my love of doodling with a night spent on Pinterest? Hand-painted tiles, of course! Pinterest showed mugs from Anthropologie. I opted for personalized tiles. Inexpensive and super easy! Two of my favorite things.
If you like to doodle, this is the craft for you! Embellishing plain tile coasters, or most any dollar store ceramic, would be a great birthday party craft for kids, although adults would no doubt want to jump in and play.
I picked up a bunch of tiles for only 16¢ each during a quick trip to our local Home Depot. I chose 4 1/4" x 4 1/4" tiles as they are the perfect size for coasters.
The guy at Home Depot who was helping me showed me his pink flamingo underpants so, of course, I had to take a picture. <winkie face>
Here is what you will need to make hand-painted tile coasters:
MATERIALS
- Tile
- Pebeo porcelaine paint pen (Available HERE)
- Window cleaner and a paper towel
- Nail polish remover with acetone
- Q-Tips
- Carbon paper (available at office supply stores), optional
- Felt feet (or a square of felt, scissors and glue), optional
Clean your tile using window cleaner.
Shake pen well before use. Press tip against a hard surface repeatedly to start ink flow. I freehanded my design, but feel free to transfer a picture using carbon paper. If using the carbon paper transfer method, just sandwich the carbon paper between the tile and your picture. Using a pencil, trace the picture and it will transfer to the tile. Or, just start drawing!
The nail polish remover and Q-Tips are in case you make a mistake that you would like to erase. I used nail polish remover then followed up with a quick wipe with window cleaner.
After you have painted your tile, allow it to air dry for 24 hours. After 24 hours, place tile directly on the middle rack of a cold oven. Set oven to 300 degrees and bake tile directly on rack for 30 minutes once oven has come up to temp. Allow tile to cool in oven. You want to avoid cracking which can be caused by a sudden change in temperature.
Adding
felt feet (found at Home Depot for 2¢ each)
is optional, but I
like that the coaster won't scratch a wood surface. If you don't add
feet, you can safely wash your coaster in the dishwasher after baking.
This little tile will be a Christmas gift for my sister who lives in San Francisco. I hope that she will like it!
If you make hand-painted tile coasters, let me know!
~Merrill ♥
There is more than one way to send flowers. A card housed in an envelope covered with brightly colored blossoms is the sure thing to cheer Justin's music therapist whose mom passed away. If you're thinking about trying your hand at envelope doodles, I recommend starting with flowers. Grab your Sharpies and draw a circle for the center. Add petals, swirls, dots and leaves. Easy peasy lemon squeezy!
Here's a snapshot of Justin "Rachmaninoff" and Sue. To learn a little something about autism and music therapy, click HERE.
Visit my Ivy Lane Designs Etsy shop for tons of nifty gifties made from recyclables.
~Merrill ♥
I love to hand letter and doodle. I often find the envelope more entertaining than its contents. Sometimes the entire area will be hand decorated, while other times simplicity is the ticket. This envelope will carry a get well card across the miles to a kind and gentle family friend. ♥
~Merrill ♥

 DIY Sharpie Mug in Purple Paisley


